Green Tea & Red Bean Paste French Macarons

Macarons (French pronunciations: maka-ron), originated in France, is a meringue based goodie where the “cookie” part is made with eggs, icing sugar, granulated sugar, almond meal (almond powder, or ground almond), and a little food colouring to spice up the colour. The filling, sandwiched between the 2 “cookies” are usually ganache, buttercream, or jam based.
Macaron’s popularity rose in North America, I would say about 2009-2010? And was what I was obsessed with getting a hold of when I visited Paris in 2011.

This photo here was taken at a petite macaron shop close to Musee d’Orsay.

Here’s one with the funky wasabi favour was taken inside the Galeries Lafayette market.
Ever since then, I’ve wanted to make these little French confectionaries at home and I’ve put it off (as you can see) for 2 years. Mainly because 1 didn’t want to attempt it until I got a KitchenAid Stand Mixer…and even then, I waited, and waited, and waited, but I finally did it…
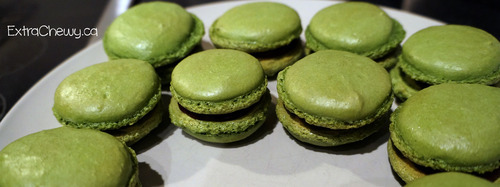
Behold my Matcha Green Tea & Red Bean Paste filling Macarons!

Nothing like a little bit of Asian fusion right?
Here’s the recipe I followed as a base for the ingredients, and as usual, I’ll tag my additions, changes and tips in ()s.
Instructions:
Now I used another site (with amazing tips on how to perfect the macaron) in combination of the one listed above (the for the ingredients) So here’s what I did…
1. SIFT SIFT SIFT. This is a step that you can not skip skip skip! Sift the almond meal, confectioner’s sugar, and your matcha powder in a large bowl.

2. WISK. Wisk everything together again just to make sure that it’s well blended and set it aside. (image below’s before wisking…)

3. Over in my KitchenAid Stand Mixer, combined the egg whites, pinch of salt, and the granulated sugar all in the mixing bowl and mixed on speed level 4 for 3 minutes.
When the 3 minute’s up, your mixture should look like this…

4. Mix for another 3 minutes, but up the power level to speed 6. This is what it should look like once the 3 minutes is up.

Look it peaked!

But it’s note quite ready.
5. Lower the wisk and wisk for another 3 minutes on power level upped to speed 8.


*6. If you plan on adding food colouring, and I did add very little green gel food colouring to mine, wisk it at power level 10 for another minute after you’ve added the colouring.
7. Now dump ALL of your sifted dry ingredients into this fluffy egg white mixture and fold it in…and fold…and fold.

8. Fill a pipping bag, or if you’re like me and have one of those syringe piping set, fill that up, with the mixture. Make sure the tip you use is big enough for a thick mixture to push through easily.
9. Line a baking sheet with parchment paper (and I prepared it by drawing circles on the under side that’s about 1 inch in diameter to give myself a little bit of guidance when pipping). Now to make sure you get a “flat” top and not a “peak”, pipe from the side, at an angle. Once they’re pipped, I banged the baking sheet on my counter a couple times to “bang out” the air bubbles in the batter. After that, I just let it sit to “dry” for 20-30 minutes. (Apologies for the cell phone picture here… but my hands were tied holding onto the pipping syringe!)

10. While the macarons are “setting”, preheat your oven to 300F. When your setting time is up, and your oven’s ready, pop them in for a totally of 16 minutes, rotating the baking sheet at 8 minutes.
Here’s how they turned out… I still need to figure out how to perfect the feet (the bottom of the cookie). I’ve learned that they’re not suppose to be hollow, and they didn’t turn out toooo bad. If yours turned out too hollow, it’s because there’s too much air in the batter.

11. When filling the macaron with any filling you use, you have to be super careful handling the macaron cookie. They’re delicate and easily squishable.
Here’s what they look like filled.
The whole recipe yields about 12-14 cookies depending on the size your cookies are.
If you’re going to attempt the macarons, I highly recommend these videos from eat.live.travel.write.
Until next time, enjoy these little treats. leave me a comment, send me message via ask, and let me know what your favourite macaron flavour combos are.